zed相机使用
Zed相机的驱动安装和图像视频获取
和众多的深度相机一样,下载SDK,然后SDK里有个上位机可以用来快速的获取视频和可视化,然后还有一套ROS,C++,python的API可以编写一些定制程序。
型号

| 型号 | ZED mini垃圾 | ZED 2 黑色的 | ZED白色的 最垃圾 | ZED 2I 想要的 |
|---|---|---|---|---|
| 特点 | 不写了自己看 | |||
| 帧率 | ||||
| 陀螺仪 |
驱动安装
ZED SDK-Python 的环境后面装
我的cuda环境:cuda12.4
参考官网的下载方式是SDK,针对不同硬件平台和cuda版本下载不同的SDK版本,这里下载的SDK版本号是4.2。

1 | $ sh ./ZED_SDK_Ubuntu22_cuda12.1_v4.2.5.zstd.run |
安装ZED-Python-API(pyzed)-针对conda
ZED SDK 安装文件夹/usr/local/zed中有一个 Python 脚本(get_python_api.py),可以自动检测操作系统、CUDA 和 Python 版本并下载相应的预编译 Python API 的whl包(pyzed)。
1 | $ cd /usr/local/zed |
1 | 这个脚本可以测试又没有安装好,这里方便复制,其实就是下面的sample的第一个 |
上位机的使用
这玩意有多个上位机,可以直接命令行输入命令运行,这些软件的位置都在tools里
1 | /usr/local/zed/tools/ZED Depth Viewer |
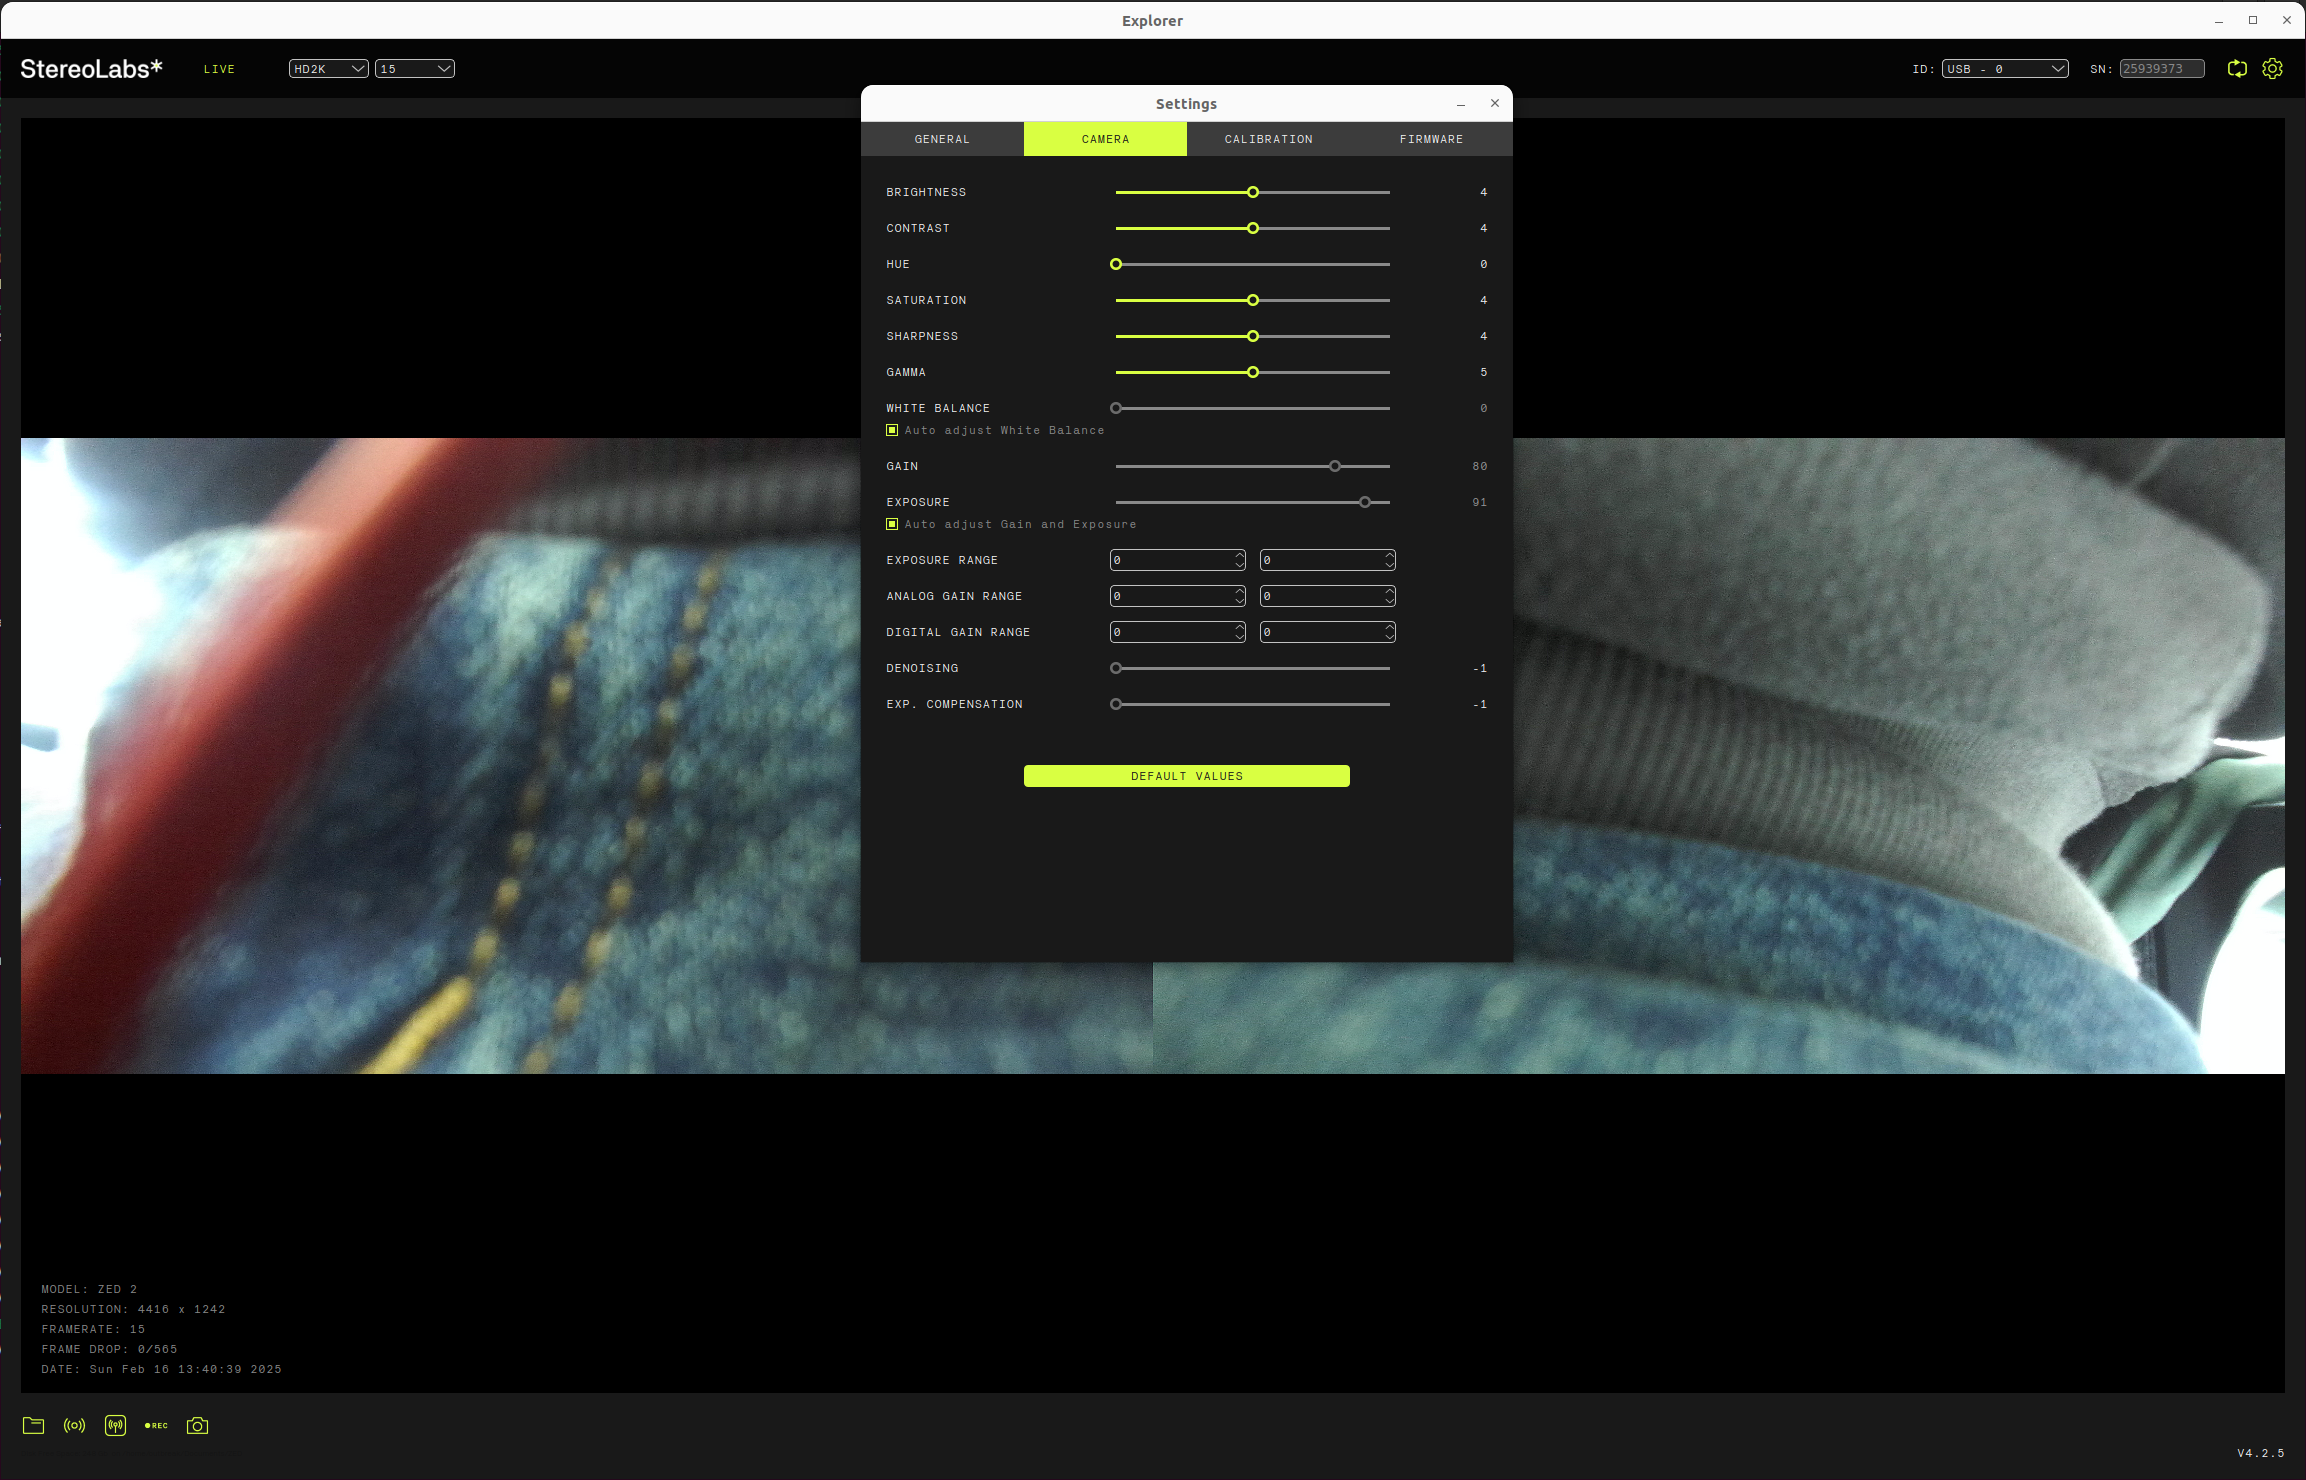
ZED Explorer
ZED Explorer是ZED实时预览和录制的应用程序。它允许您更改视频分辨率、纵横比和相机参数,并捕获高分辨率快照和3D视频。
如果ZED被您的计算机识别,您将看到来自相机的3D视频。
ZED Depth Viewer
ZED Depth Viewer使用ZED SDK捕获和显示深度图和3D点云。运行ZED Depth Viewer,检查深度图是否正确显示。尝试不同的深度模式,以选择最适合您的深度质量/性能比。
1 | 工业垃圾,写的一托,相机打不开 |
工业垃圾的上位机bug一堆
用上位机看zed mini深度图,看不到,还把我系统的所有小图表都崩没了,然后还卡住了,垃圾至极。比realsense不知道拉到哪里去了。
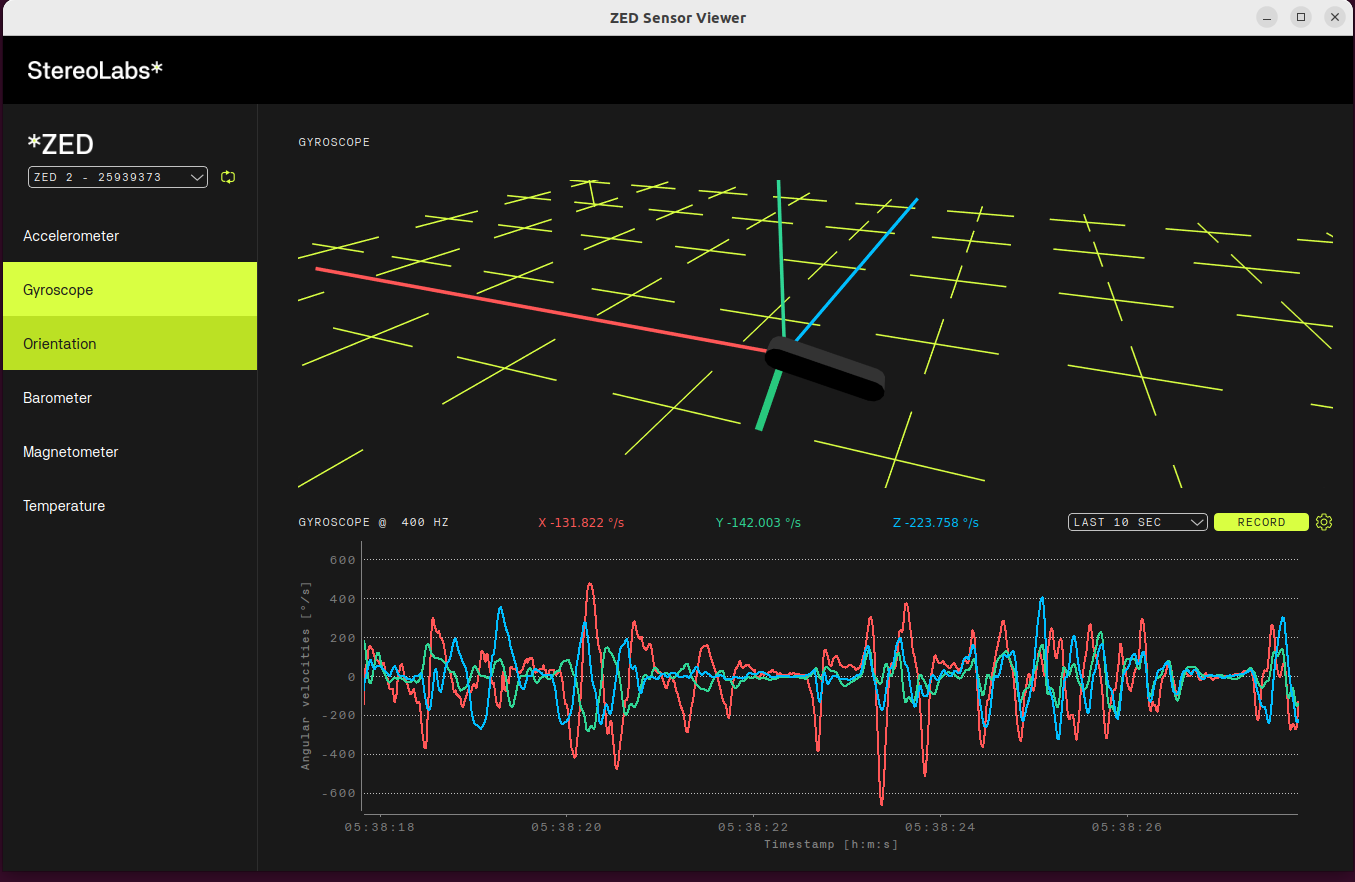
ZED Sensor Viewer
能看到当前的陀螺仪,加速度,磁力计数据。
SED_SVO_Editor
ZED tutorials
ZED SDK包括几个教程和示例,用于学习如何使用视频、深度、位置跟踪、地图和其他信息,以及许多第三方集成。自己看吧。代码路径在/usr/local/zed/samples/tutorials里面
| Tutorial | Description | Link |
|---|---|---|
| Hello ZED | This is the simplest tutorial. It shows how to open a stereo camera and print its serial number in the terminal. | [C++](https://github.com/stereolabs/zed-examples/tree/master/tutorials/tutorial 1 - hello ZED/cpp/) [Python](https://github.com/stereolabs/zed-examples/tree/master/tutorials/tutorial 1 - hello ZED/python/) |
| Image Capture | Shows how to open a stereo camera, capture an image and print its timestamp and image size in the terminal. | [C++](https://github.com/stereolabs/zed-examples/tree/master/tutorials/tutorial 2 - image capture/cpp/) [Python](https://github.com/stereolabs/zed-examples/tree/master/tutorials/tutorial 2 - image capture/python/) |
| Depth Perception | Shows how to retrieve the depth and point cloud of a scene, and print the distance of a given point in the terminal. | [C++](https://github.com/stereolabs/zed-examples/tree/master/tutorials/tutorial 3 - depth sensing/cpp/) [Python](https://github.com/stereolabs/zed-examples/tree/master/tutorials/tutorial 3 - depth sensing/python/) |
| Camera Tracking | Shows how to enable positional tracking and get the position and orientation of the camera in real time. | [C++](https://github.com/stereolabs/zed-examples/tree/master/tutorials/tutorial 4 - positional tracking/cpp/) [Python](https://github.com/stereolabs/zed-examples/tree/master/tutorials/tutorial 4 - positional tracking/python/) |
| Spatial Mapping | Shows how to enable spatial mapping and capture a mesh or fused point cloud of the environment. | [C++](https://github.com/stereolabs/zed-examples/tree/master/tutorials/tutorial 5 - spatial mapping/cpp/) [Python](https://github.com/stereolabs/zed-examples/tree/master/tutorials/tutorial 5 - spatial mapping/python/) |
| 3D Object Detection | Shows how to detect objects in a scene and localize them in 3D. | [C++](https://github.com/stereolabs/zed-examples/tree/master/tutorials/tutorial 6 - object detection/cpp/) [Python](https://github.com/stereolabs/zed-examples/tree/master/tutorials/tutorial 6 - object detection/python/) |
| Using Sensors | Shows how to acquire IMU, barometer and magnetometer data. | [C++](https://github.com/stereolabs/zed-examples/tree/master/tutorials/tutorial 7 - sensor data/cpp/) [Python](https://github.com/stereolabs/zed-examples/tree/master/tutorials/tutorial 7 - sensor data/python/) |
| 3D Body Tracking | Shows how to detect human body skeletons in a 3D scene. | [C++](https://github.com/stereolabs/zed-examples/tree/master/tutorials/tutorial 7 - sensor data/cpp/) [Python](https://github.com/stereolabs/zed-sdk/tree/master/tutorials/tutorial 8 - body tracking/python) |
| Geo-tracking | Shows how to use the Geo-tracking Fusion API to display fused GNSS and positional tracking data on a map. | [C++](https://github.com/stereolabs/zed-examples/tree/master/tutorials/tutorial 7 - sensor data/cpp/) [Python](https://github.com/stereolabs/zed-sdk/tree/master/tutorials/tutorial 8 - body tracking/python) |
只讲解深度图/视差图/彩色图获取
要获得数据,首先要使用grab函数获得数据
然后通过retrieve_image函数获得每个视角的彩色图等
然后通过retrieve_measure函数获得每个视角的深度图视差图等
默认名称获得的是左视角的深度图和视差图,比如说DEPTH是指左目的深度图,如果想获得右目的,那就得参数为DEPTH_RIGHT
| Enumerator | |
|---|---|
| DISPARITY | Disparity map. Each pixel contains 1 float. Type: sl.MAT_TYPE.F32_C1 |
| DEPTH | Depth map in sl.UNIT defined in sl.InitParameters.coordinate_units. Each pixel contains 1 float. Type: sl.MAT_TYPE.F32_C1 |
| CONFIDENCE | Certainty/confidence of the depth map. Each pixel contains 1 float. Type: sl.MAT_TYPE.F32_C1 |
| XYZ | Point cloud. Each pixel contains 4 float (X, Y, Z, not used). Type: sl.MAT_TYPE.F32_C4 |
| XYZRGBA | Colored point cloud. Each pixel contains 4 float (X, Y, Z, color). The color should to be read as an unsigned char[4] representing the RGBA color. Type: sl.MAT_TYPE.F32_C4 |
| XYZBGRA | Colored point cloud. Each pixel contains 4 float (X, Y, Z, color). The color should to be read as an unsigned char[4] representing the BGRA color. Type: sl.MAT_TYPE.F32_C4 |
| XYZARGB | Colored point cloud. Each pixel contains 4 float (X, Y, Z, color). The color should to be read as an unsigned char[4] representing the ARGB color. Type: sl.MAT_TYPE.F32_C4 |
| XYZABGR | Colored point cloud. Each pixel contains 4 float (X, Y, Z, color). The color should to be read as an unsigned char[4] representing the ABGR color. Type: sl.MAT_TYPE.F32_C4 |
| NORMALS | Normal vectors map. Each pixel contains 4 float (X, Y, Z, 0). Type: sl.MAT_TYPE.F32_C4 |
| DISPARITY_RIGHT | Disparity map for right sensor. Each pixel contains 1 float. Type: sl.MAT_TYPE.F32_C1 |
| DEPTH_RIGHT | Depth map for right sensor. Each pixel contains 1 float. Type: sl.MAT_TYPE.F32_C1 |
| XYZ_RIGHT | Point cloud for right sensor. Each pixel contains 4 float (X, Y, Z, not used). Type: sl.MAT_TYPE.F32_C4 |
| XYZRGBA_RIGHT | Colored point cloud for right sensor. Each pixel contains 4 float (X, Y, Z, color). The color needs to be read as an unsigned char[4] representing the RGBA color. Type: sl.MAT_TYPE.F32_C4 |
| XYZBGRA_RIGHT | Colored point cloud for right sensor. Each pixel contains 4 float (X, Y, Z, color). The color needs to be read as an unsigned char[4] representing the BGRA color. Type: sl.MAT_TYPE.F32_C4 |
| XYZARGB_RIGHT | Colored point cloud for right sensor. Each pixel contains 4 float (X, Y, Z, color). The color needs to be read as an unsigned char[4] representing the ARGB color. Type: sl.MAT_TYPE.F32_C4 |
| XYZABGR_RIGHT | Colored point cloud for right sensor. Each pixel contains 4 float (X, Y, Z, color). The color needs to be read as an unsigned char[4] representing the ABGR color. Type: sl.MAT_TYPE.F32_C4 |
| NORMALS_RIGHT | Normal vectors map for right view. Each pixel contains 4 float (X, Y, Z, 0). Type: sl.MAT_TYPE.F32_C4 |
| DEPTH_U16_MM | Depth map in millimeter whatever the sl.UNIT defined in sl.InitParameters.coordinate_units. Invalid values are set to 0 and depth values are clamped at 65000. Each pixel contains 1 unsigned short. Type: sl.MAT_TYPE.U16_C1 |
| DEPTH_U16_MM_RIGHT | Depth map in millimeter for right sensor. Each pixel contains 1 unsigned short. Type: sl.MAT_TYPE.U16_C1 |
1 | ######################################################################## |

Sample usage
| Sample | Description | Link |
|---|---|---|
| Camera Control | Shows how camera settings like Exposure, Gain, Contrast, Sharpness, etc. can be modified and display the resulting image. | [C++](https://github.com/stereolabs/zed-sdk/tree/master/camera control/cpp) [Python](https://github.com/stereolabs/zed-sdk/tree/master/camera control/python) |
| Camera Streaming | Shows how to stream the ZED stereo video on an IP network, decode the video and display its live 3D point cloud. | [GitHub](https://github.com/stereolabs/zed-sdk/tree/master/camera streaming) |
| Depth Sensing | Shows how to capture a 3D point cloud and display it in an OpenGL window. | [C++](https://github.com/stereolabs/zed-sdk/tree/master/depth sensing/depth sensing/cpp) [Python](https://github.com/stereolabs/zed-sdk/tree/master/depth sensing/depth sensing/python) |
| Positional Tracking | Displays the live position and orientation of the camera in a 3D window. | [C++](https://github.com/stereolabs/zed-sdk/tree/master/positional tracking/positional tracking/cpp) [Python](https://github.com/stereolabs/zed-sdk/tree/master/positional tracking/positional tracking/python) |
| Spatial Object Detection | 2D Display Detect and track objects in the scene, and display their 3D bounding boxes over the live image. | [C++](https://github.com/stereolabs/zed-sdk/tree/master/object detection/image viewer/cpp) [Python](https://github.com/stereolabs/zed-sdk/tree/master/object detection/image viewer/python) |
| Spatial Object Detection | 3D Display Detect and track objects in the scene, and display their 3D bounding boxes over the live point cloud. | [C++](https://github.com/stereolabs/zed-sdk/tree/master/object detection/birds eye viewer/cpp) [Python](https://github.com/stereolabs/zed-sdk/tree/master/object detection/birds eye viewer/cpp) |
| Body Tracking | Shows how to detect and track 3D human bodies in space and display skeletons over the live image. | [C++](https://github.com/stereolabs/zed-sdk/tree/master/body tracking/body tracking/cpp) [Python](https://github.com/stereolabs/zed-sdk/tree/master/body tracking/body tracking/python) |
| Spatial Mapping | Captures a live 3D mesh of the environment and displays it as an overlay on the camera image. | [C++](https://github.com/stereolabs/zed-sdk/tree/master/spatial mapping/spatial mapping/cpp) [Python](https://github.com/stereolabs/zed-sdk/tree/master/spatial mapping/spatial mapping/python) |
| Plane Detection | Shows how to detect floor and planar areas in the scene and draw them on the image. | [C++](https://github.com/stereolabs/zed-sdk/tree/master/plane detection/plane detection/cpp) [Python](https://github.com/stereolabs/zed-examples/tree/master/plane detection/plane detection/python) |
| Video Recording | Shows how to record a lossless or compressed video in SVO format. | C++ Python |
| Video Playback | Shows how to playback a recorded SVO video. | C++ Python |
| Video Export | Opens an SVO file and exports video and depth to PNG or AVI files. | C++ Python |
| Multi Camera | Shows how to open and use multiple ZED cameras at the same time in a single application. | [C++](https://github.com/stereolabs/zed-sdk/tree/master/depth sensing/multi camera/cpp) [Python](https://github.com/stereolabs/zed-sdk/tree/master/depth sensing/multi camera/cpp) |
正在更新
 微信
微信- 支付宝

